Kubernetes SSL Certificates- How to Set-up a Cluster With SSL Termination

Using Cert Manager on a Kubernetes cluster to do SSL termination.
By the end of this guide you will be able to:
- Route SSL traffic from a domain your own (example.com) to a kubernetes cluster
- Understand how to add additional domains to your cluster
- Certificate renewal is automatic, handled by Cert Manager
This step by step refers to the Cert-Manager quickstart guide. Please follow that for the most up-to-date, maintained version.
1. Create a Kubernetes Cluster
First , create a kubernetes cluster (sponsored link) you can do this easily on Digital Ocean as a quick start for ~$30 a month.
2. Install Helm and Tiller
Once you've got a kubernetes cluster you need to install Helm. Helm (helps you manage Kubernetes applications) has two parts: a client (helm) and a server (tiller). You need to install teller (the server side component) in order for helm (the client) to work.
This guide follows the official helm install guide.
Once you've installed Helm, you should be able to use helm help from the command line.
Set-up Tiller Permissions
First create a service account for tiller:
kubectl create serviceaccount tiller --namespace=kube-system
The service account needs admin privileges, so to grant them to the tiller service account:
Grant the tiller service account cluster admin privileges:
kubectl create clusterrolebinding tiller-admin --serviceaccount=kube-system:tiller --clusterrole=cluster-admin
Set-up Helm
helm init"installs Tiller (the Helm server-side component) onto your Kubernetes Cluster and sets up local configuration" seeman helmfor more info
Init helm, which installs tiller on your kubernetes cluster:
helm init --service-account=tiller
Update the helm repository with the latest charts:
helm repo update
3. Deploy Nginx Ingress Controller
The Nginx instress controller implements the desired state set-out in a Kuberernetes Ingress Resource. Ingress resources do nothing without an ingress controller to act upon them. Nginx 'simply' makes the desired states set-out in the resource come actually 'work'. See Cert-Manager docs for mor info.
helm install stable/nginx-ingress --name quickstart
Eventually, your cloud provider will lease a public IP addess to your Nginx ingress controller. Until that, it will show "<pending>". To see this, and wait unti it's done do:
kubectl get -w services
quickstart-nginx-ingress-controller should eventually have an EXTERNAL-IP assigned.
4. Configure DNS to route traffic to your kubernetes ingress controller
Keep a copy of your assigned public ip from your cloud provider for the quickstart-nginx-ingress-controller service. To see it, issue: kubectl get service quickstart-nginx-ingress-controller and copy the value for EXTERNAL-IP.
Using DNS, you need to assign your domain to the ip address of your load balancer. Using an A record for example. For example, log into your domain registrar to make this change.
5. Create an example website deployment
Here we will simply deploy a web application using Nginx to serve the "It Works" default page. It could be any application.
Create an nginx deployment:
apiVersion: apps/v1 # for versions before 1.9.0 use apps/v1beta2
kind: Deployment
metadata:
  name: nginx-deployment
spec:
  selector:
    matchLabels:
      app: nginx
  replicas: 2 # tells deployment to run 2 pods matching the template
  template:
    metadata:
      labels:
        app: nginx
    spec:
      containers:
      - name: nginx
        image: nginx:1.15.11
        ports:
        - containerPort: 80
To deploy the above enter:
kubectl apply -f https://pastebin.com/raw/S2Krybf8
Create an associated service:
kind: Service
metadata:
  name: nginx-deployment
spec:
  ports:
  - port: 80
    targetPort: 80
    protocol: TCP
  selector:
    app: nginx
Apply the service:
kubectl apply -f https://pastebin.com/raw/XJwYKe68
6. Deploy Ingress Resource
You need to modify the ingress resource to your website domain name.
apiVersion: extensions/v1beta1
kind: Ingress
metadata:
  annotations:
    certmanager.k8s.io/acme-challenge-type: http01
    certmanager.k8s.io/issuer: letsencrypt-staging
    kubernetes.io/ingress.class: nginx
  name: nginx-ingress
  namespace: default
spec:
  rules:
  - host: www.example.com
    http:
      paths:
      - backend:
          serviceName: nginx-deployment
          servicePort: 80
        path: /
  tls:
  - hosts:
    - www.example.com
    secretName: quickstart-example-tls
You can edit just before applying a manifest with the --edit flag:
kubectl create --edit -f https://pastebin.com/raw/Nu6HZjhx
Now the nginx ingress controller will in the background assign an address to this ingress resource. Wait for this to complete, then an ip address will appear beneath ADDRESS for the ingress resource.
To check, run kubectl get -w ingress
Once the ingress resource has an IP, traffic can be routed to it using the ingress controller. Visit your website you should see an SSL warning:
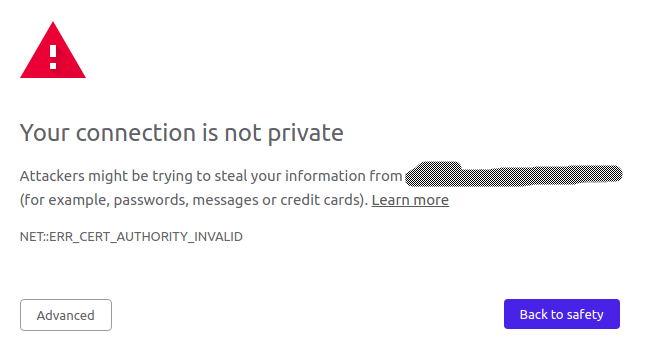
This is OK because we've not installed cert manager yet. It does show that the ingress controller is set-up and running correctly though. Skip past the SSL warning and you should see the Nginx welcome page:
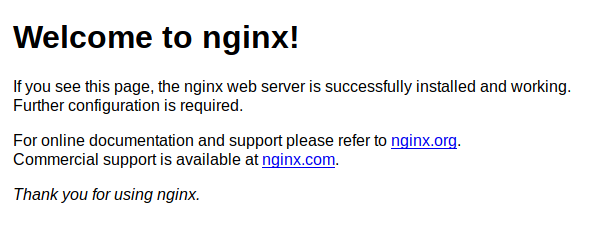
It's vital to ensure your ingress controller is working, otherwise Let's Encypt won't be able to go out over the net and fetch certificates.
7. Deploy Cert Manager
Note that cert manager creates custom resource definitions in order to complete it's job:
- certificates
- challenges
- issers
- orders
These resources collectivly make it possible for Cert Mananger to manage the requesting, and renewal of certificats for Ingress Resources.
As per cert-managers install guide, install cert manager by deploying the manifests:
# Install the cert-manager CRDs. We must do this before installing the Helm
# chart in the next step for `release-0.7` of cert-manager:
$ kubectl apply -f https://raw.githubusercontent.com/jetstack/cert-manager/release-0.7/deploy/manifests/00-crds.yaml

## IMPORTANT: if the cert-manager namespace **already exists**, you MUST ensure
## it has an additional label on it in order for the deployment to succeed
$ kubectl label namespace cert-manager certmanager.k8s.io/disable-validation="true"

## Add the Jetstack Helm repository
$ helm repo add jetstack https://charts.jetstack.io
## Updating the repo just incase it already existed
$ helm repo update

## Install the cert-manager helm chart
$ helm install --name cert-manager --namespace cert-manager jetstack/cert-manager
8. Configure Let's Encrypt Issuer
We're going to create a staging issuer, for testing, then a live issuer.
Edit the following to include your own email address:
apiVersion: certmanager.k8s.io/v1alpha1
kind: Issuer
metadata:
  name: letsencrypt-staging
  spec:
   acme:
     # The ACME server URL
     server: https://acme-staging-v02.api.letsencrypt.org/directory
     # Email address used for ACME registration
     email: user@example.com
     # Name of a secret used to store the ACME account private key
     privateKeySecretRef:
       name: letsencrypt-staging
     # Enable the HTTP-01 challenge provider
     http01: {}
For example:
kubectl create --edit -f https://pastebin.com/raw/2wkP5tft
You can then use kubectl get issuers to view /describe the state of the issuer.
Now create the production issuer: Add you email address
   apiVersion: certmanager.k8s.io/v1alpha1
   kind: Issuer
   metadata:
     name: letsencrypt-prod
   spec:
     acme:
       # The ACME server URL
       server: https://acme-v02.api.letsencrypt.org/directory
       # Email address used for ACME registration
       email: user@example.com
       # Name of a secret used to store the ACME account private key
       privateKeySecretRef:
         name: letsencrypt-prod
       # Enable the HTTP-01 challenge provider
       http01: {}
Edit and apply:
kubectl create --edit -f https://pastebin.com/raw/QxkRsX3V
Again, You can then use kubectl get issuers to view /describe the state of the issuer.
9. Deploy a TLS enabled Ingress Resource
Edit the ingress resource we created earlier to include the annotations to kick off the Cer-Manager certificate request process:
kubectl create --edit -f https://pastebin.com/raw/sNV0JHkG
Notice the two additional annotations:
- certmanager.k8s.io/issuer: "letsencrypt-staging"
- certmanager.k8s.io/acme-challenge-type: http01
Remember to update the domain / web address to the one you own.
Once edited, your ingress resource should look similar too:
apiVersion: extensions/v1beta1
kind: Ingress
metadata:
  annotations:
    kubernetes.io/ingress.class: nginx
    certmanager.k8s.io/issuer: "letsencrypt-staging"
    certmanager.k8s.io/acme-challenge-type: http01

  name: nginx-ingress
  namespace: default
spec:
  rules:
  - host: www.example.com
    http:
      paths:
      - backend:
          serviceName: nginx-deployment
          servicePort: 80
        path: /
  tls:
  - hosts:
    - www.example.com
    secretName: quickstart-example-tls
Cert-manager will read these annotations and use them to create a certificate, such than you can see it:
kubectl get certificatesshould showquickstart-example-tls.
You can view more details about the certificate by issuing a standard describe command: kubectl describe secret quickstart-example-tls.
If you see a tls.crt and tls.key then you can safely continue to getting a production key. Now it's safe to request a production certificate.
Get production certificate from lets encrypt
We're now going to re-deploy the manifest with issuer set to prod:
Your manifest should be similar to:
apiVersion: extensions/v1beta1
kind: Ingress
metadata:
name: nginx-ingress
annotations:
kubernetes.io/ingress.class: "nginx"
certmanager.k8s.io/issuer: "letsencrypt-prod"
certmanager.k8s.io/acme-challenge-type: http01
spec:
  tls:
  - hosts:
    - example.example.com
    secretName: quickstart-example-tls
  rules:
  - host: example.example.com
    http:
      paths:
      - path: /
        backend:
          serviceName: nginx-deployment
          servicePort: 80
Change the domain name to your own web address:
kubectl create --edit -f https://pastebin.com/raw/WKxmEpLa
You will also need to delete the existing secret, which cert-manager is watching and will cause it to reprocess the request with the updated issuer. src
kubectl delete secret quickstart-example-tls
Eventually, a TLS certificate will be issued for your domain, and assigned to your ingress resource. You can check the process (which usually only takes a few secconds) by inspecting the order progress:
kubectl get orders
kubectl describe order <order name> # retry if no updates to get latests events
# Also inspect the certificate once issues:
kubectl describe certificate quickstart-example-tls