Scaling Kubernetes ReadWriteMany Ceph Deployments

Run ReadWriteMany volumes on Google Kubernetes engine which allows your Deployments with persistent data to scale.
This allows us to scale a Kubernetes deployment with Persistent Volumes without the deployment getting stuck waiting for a realease on a volume.
This tutotial has a repo which has been pinned as a reference of a working tutotial for Kubernetes Ceph deployments.
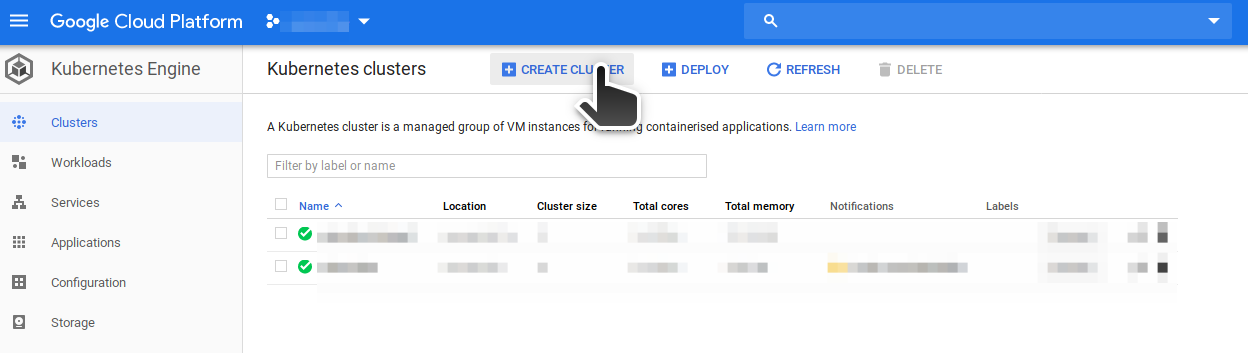
Setup a Kubernetes Cluster in Google Console
Warning: The default options for creating a Kubernetes Cluster will not work for Ceph. See below for the settings needed
Begin creating cluster
You can follow the step by step below, or, use the command (you still need to create the project first to get project name):
gcloud beta container --project "<project-name>" \
clusters create "<cluster-name>" \
--zone "us-central1-a" \
--username "admin" \
--cluster-version "1.11.8-gke.6" \
--machine-type "n1-standard-1" \
--image-type "UBUNTU" \
--disk-type "pd-standard" \
--disk-size "100" \
--node-labels preemptive=false \
--metadata disable-legacy-endpoints=true \
--scopes "https://www.googleapis.com/auth/devstorage.read_only","https://www.googleapis.com/auth/logging.write","https://www.googleapis.com/auth/monitoring","https://www.googleapis.com/auth/servicecontrol","https://www.googleapis.com/auth/service.management.readonly","https://www.googleapis.com/auth/trace.append" \
--num-nodes "3" \
--enable-cloud-logging \
--enable-cloud-monitoring \
--no-enable-ip-alias \
--network "projects/<project-name>/global/networks/default" \
--subnetwork "projects/<project-name>/regions/us-central1/subnetworks/default" \
--addons HorizontalPodAutoscaling,HttpLoadBalancing \
--no-enable-autoupgrade \
--no-enable-autorepair
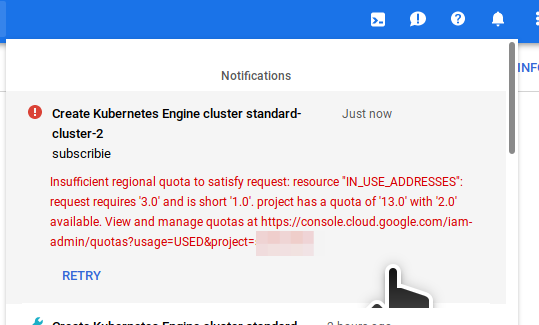
Note: you will likley hit quota limmits on your Google account preventing this from succeeding. You may need to request Google increases the number of ips and nodes allowed on your account. You can do this via the google web console.
The message "Insufficient regional quota to satisfy request: resource IN_USE_ADDRESSES: requires '3.0' and is show '1.0'. .. may appear. In which case, visit your quotas page and request an increase if appropriate.
The image type must be ubuntu because it contains drivers required by Ceph, the default (cos) will not work and you will see a modprobe error when ceph attempts to load.
The dafault CPU and RAM is sufficient for a working demo. You must start with 3 nodes, and each node will have:
- 1 vCPU
- 3.75 GB memory
- 100 GB Standard Persistent disk
Set image type to Ubuntu:
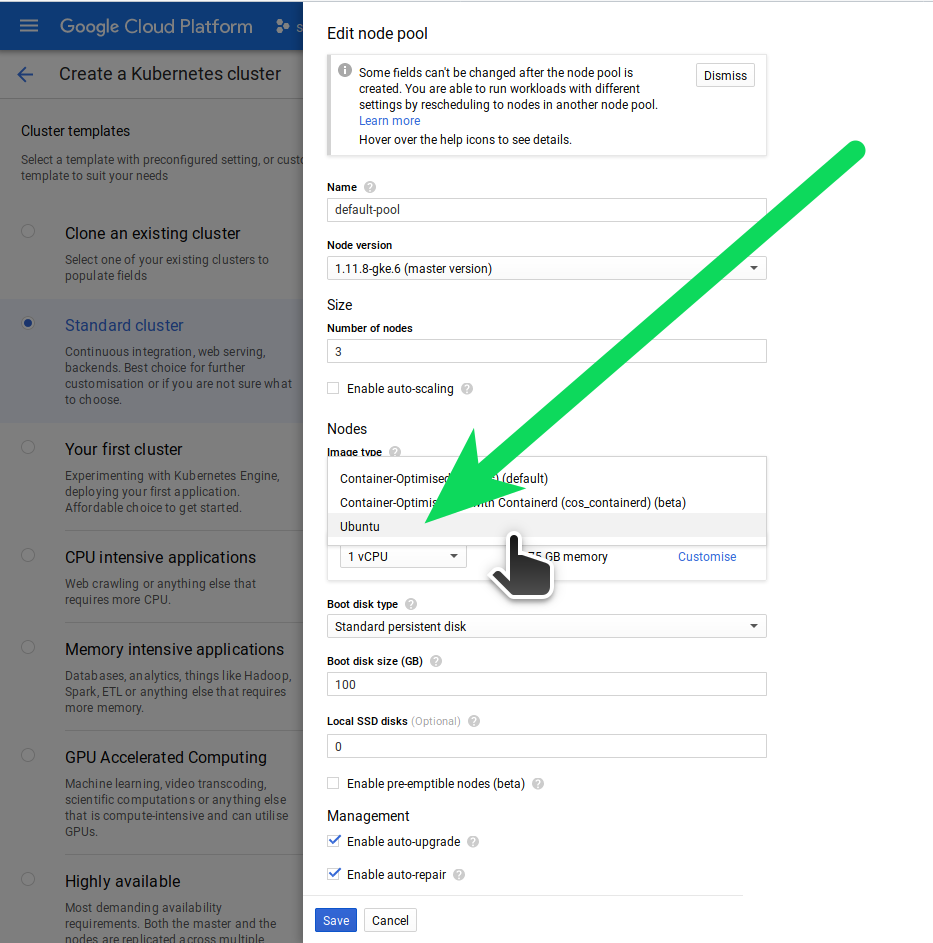
Uncheck (optional?):
- Enable auto-upgrade
- Enable auto-repair (because both these
Add the following labels:
- preemptive=false
- disable-legacy-endpoints=true
We use the label preemptive=false as a way to mark these nodes as non preemptive. Understand that the label has no effect (you still need to make sure "Enable pre-emptible nodes" is un-checked)
Add labels:
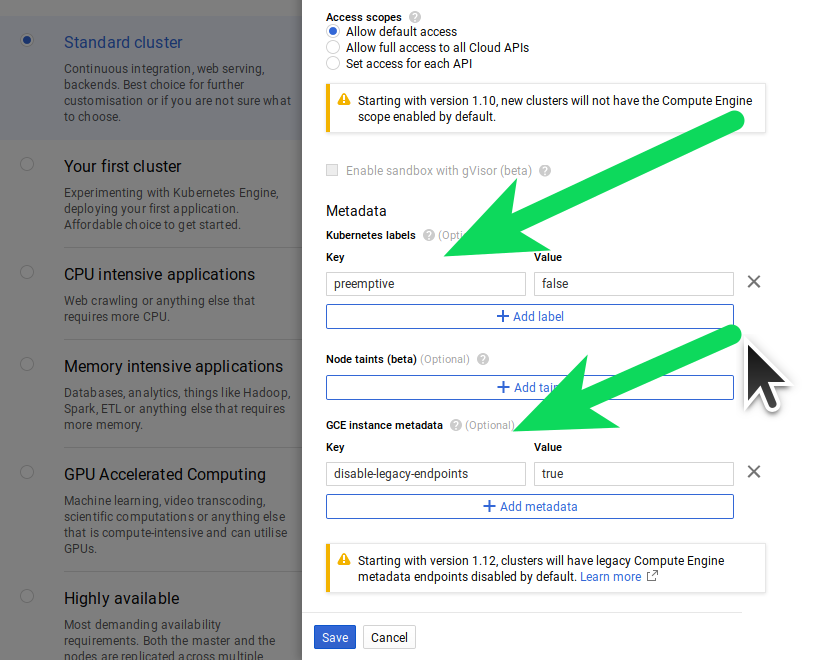
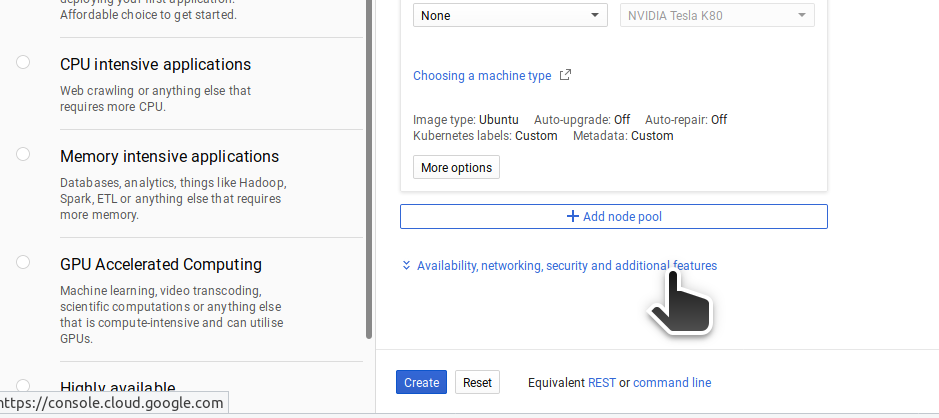
Press save to confirm your nodes then click 'Availability, networking and additional features:
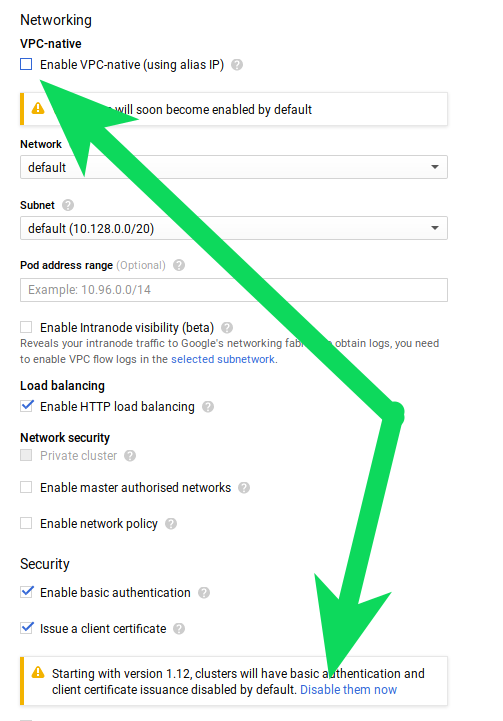
Choose both the following:
- Enable VPC-native
- Disable basic autentication and client certificate issuance
Connect to your cluster
After your cluster is ready, connect to it:

gcloud container clusters get-credentials standard-cluster-1 --zone us-central1-a --project <project-name>
Become cluster admin:
kubectl create clusterrolebinding cluster-admin-binding --clusterrole=cluster-admin --user=$(gcloud config get-value core/account)
Note: The
--userflag ofclusterrolebindingis case sensitive. If you seeError from server (Forbidden): error when creating ... must have cluster-admin privileges to use thethen check your real user email addres on the "IAM & admin" page in Google Console.
Clone Rook & Ceph for Kubernetes
Get the repo:
https://github.com/chrisjsimpson/rook.git
Checkout to the tag v1.0.0-ceph-GKE:
git checkout v1.0.0-ceph-GKE
cd rook/cluster/examples/kubernetes/ceph/
Deploy the manifests needed: (bases on the Rook Docs)
kubectl create -f common.yaml
kubectl create -f operator.yaml
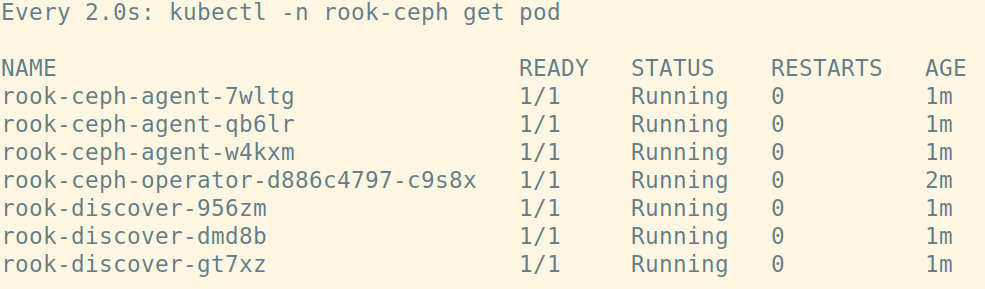
Verify rook-ceph has come up successfully
Verify the rook-ceph-operator, rook-ceph-agent, and rook-discover pods are in the Running state before proceeding:
watch kubectl -n rook-ceph get pod
Output:
Create the Rook Ceph Cluster
Now that the rook-ceph-operator, rook-ceph-agents and rook-discover pods are up, it's safe to bring up a ceph cluster.
For the cluster to survive reboots, make sure you set the dataDirHostPath property that is valid for your hosts. For more settings, see the documentation on configuring the cluster.
See Rook Docs
Create the cluster:
kubectl create -f cluster.yaml
Whilst the cluster is being created, if you run:
kubectl -n rook-ceph get pod
You will see the beauty of the rook-ceph-operator doing it's thing; ensuring a valid ceph-cluster is brought up with all the components needed for a valid ceph cluster. This includes:
- rook-ceph-mon-a, b and c
- rook-ceph-mgr-a
- rook-ceph-osd-0, 1 and 2
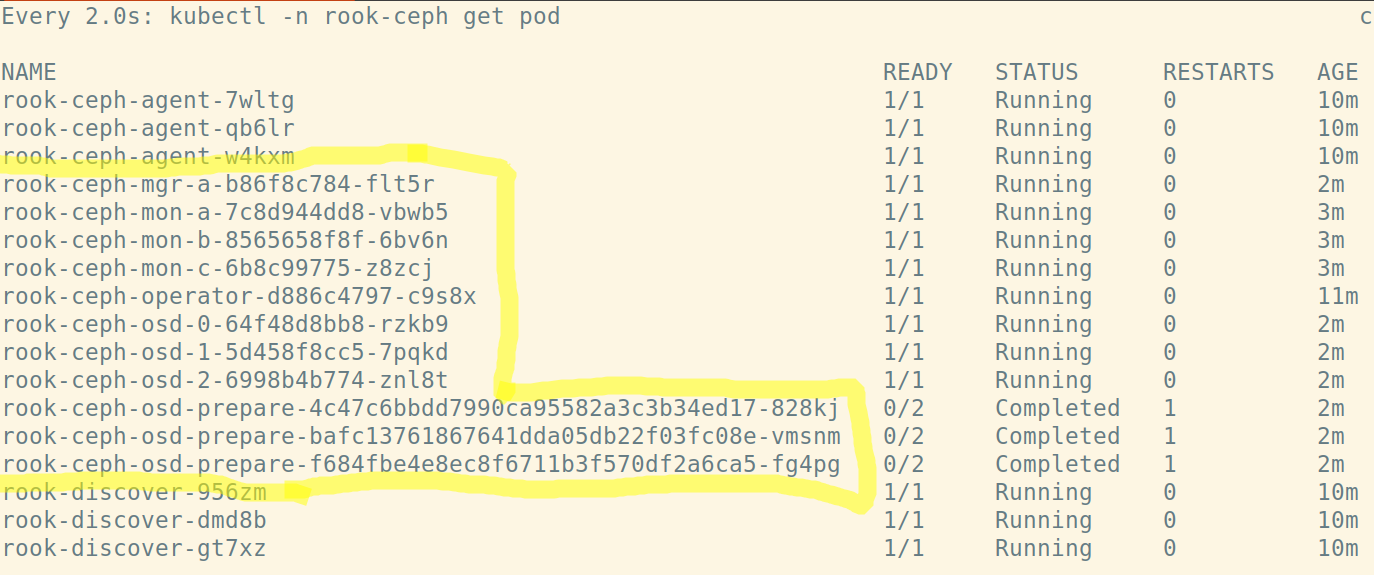
Check out the Ceph Documentation to understand what OSD's, Monitors, Managers and MDSs are.
Verify Ceph status using the toolkit
The toolkit is a helpful pod which contains programs to inspect the status of your ceph cluster status etc. To run it:
kubectl create -f toolbox.yaml
# Wait a litte, then exec into the toolkit
kubectl -n rook-ceph exec -it $(kubectl -n rook-ceph get pod -l "app=rook-ceph-tools" -o jsonpath='{.items[0].metadata.name}') bash
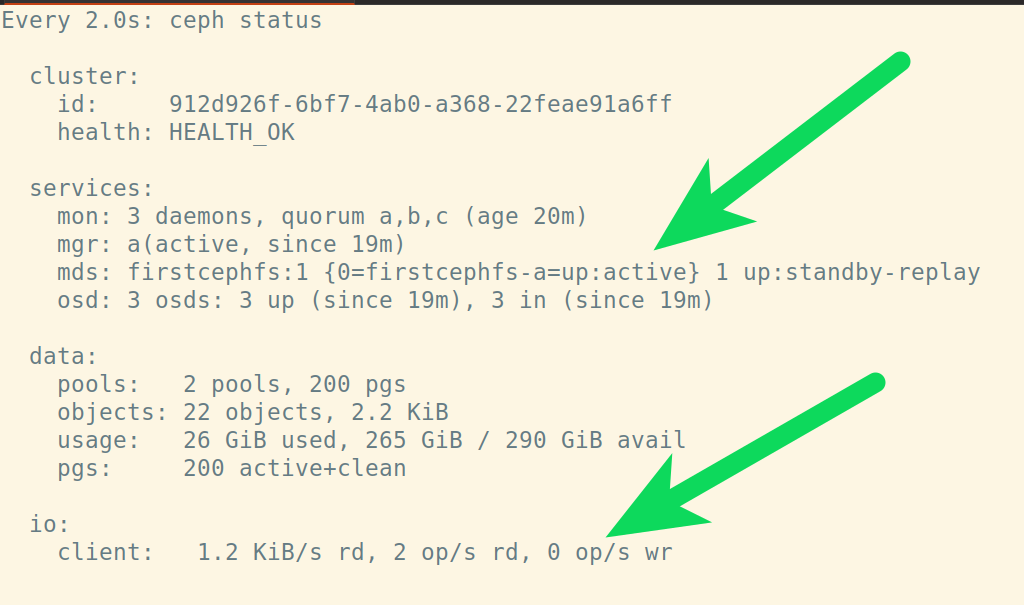
Now you're inside the toolkit pod, run ceph status:

Remember we chose 100GB for each of the nodes, and we have 265GB available for use in our Ceph cluster! (The rest is taken up by the Ubuntu os and other tooling running on the nodes.
Remember to exit out of the toolkit if you're still inside it ;)
Create a Ceph Shared Filesystem on Kubernetes
It's finally time to create a shared filesystem capable of ReadWriteMany on our Kubernetes cluster, and shared it accross multiple pods!
The steps are:
- Declare a Filesystem
- Reference the Filesystem name in Deployment manifests
We've created a test-filesystem.yaml example for you in the repo:
apiVersion: ceph.rook.io/v1
kind: CephFilesystem
metadata:
  name: firstcephfs
  namespace: rook-ceph
spec:
  metadataPool:
    replicated:
      size: 2
  dataPools:
    - replicated:
        size: 2
  metadataServer:
    activeCount: 1
    activeStandby: true
To apply it:
kubectl create -f test-filesystem.yaml
Jump back into your toolkit, ceph status and you'll soon see some i/o activity on your ceph cluster and the filesystem you just created as active:
kubectl -n rook-ceph exec -it $(kubectl -n rook-ceph get pod -l "app=rook-ceph-tools" -o jsonpath='{.items[0].metadata.name}') bash
watch ceph stauts
Output:
Use your ManyReadWrite filesystem
A Deployment example of using an Nginx deployment, with a PersistantVolume (using the Ceph Filesystem we just created).
- The Deployment can be scaled, with the PersistantVolume
- Writes to any of the pods are automatical handles by Ceph, so all pods see the same data
- Isn't that awesome!?
Create Deployment using the Ceph Filesystem
This section of the tutorial is inspired by, SysEleven's excellent example on the topic.
First create a test namespace for this deployment:
kubectl create namespace read-write-many-tutorial
Now deploy the following manifest which defines a Deployment
- An Nginx pod with
- two replicates
- one volume, which uses Ceph (the
fsNamemust match the filesystem name we created earlier) - Although not explicitly written, this volume is ReadWriteMany (steps verify test this are below)
test-multi-write.yaml
apiVersion: apps/v1beta1
kind: Deployment
metadata:
  name: nginx-deployment
  namespace: read-write-many-tutorial
spec:
  replicas: 2
  template:
    metadata:
      labels:
        app: read-write-many
    spec:
      volumes:
      - name: nginx-data
        flexVolume:
          driver: ceph.rook.io/rook
          fsType: ceph
          options:
            fsName: firstcephfs
            clusterNamespace: rook-ceph
      containers:
      - image: nginx:latest
        name: nginx
        ports:
        - containerPort: 80
        volumeMounts:
        - mountPath: "/data"
          name: nginx-data
          readOnly: false
Apply the Deployment:
kubectl apply -f test-multi-write.yaml
namespace/read-write-many-tutorial created
Verify both nginx replica pods are running:
kubectl get pods --namespace read-write-many-tutorial
NAME                               READY   STATUS    RESTARTS   AGE
nginx-deployment-df5b48897-cf5rf   1/1     Running   0          34s
nginx-deployment-df5b48897-w8hs5   1/1     Running   0          33s
Kubernetes writemany
Now the fun starts! We're going to write to one pod, and see the data also be accessible on the other pod. Yes, this is kubernetes persistent volume with multiple pods write.
Wrote some data to the volume from pod one:
kubectl exec --namespace read-write-many-tutorial $(kubectl get pods --namespace read-write-many-tutorial -o jsonpath='{.items[0].metadata.name}') -i -t -- bash -c 'echo "Inconceivable!" > /data/test.txt'
Now, from pod two, you will see the same data also accesible from the pod two:
kubectl exec --namespace read-write-many-tutorial $(kubectl get pods --namespace read-write-many-tutorial -o jsonpath='{.items[1].metadata.name}') -i -t -- bash -c 'cat /data/test.txt'
Output:
Inconceivable!
Scale the deployment
Now the real test. Can we scale the deployment sucessfully and read the same data from any pod in the deployment?
Scale the deployment:
kubectl scale deployment.v1.apps/nginx-deployment --replicas=5 --namespace=read-write-many-tutorial
Eventually you will see the 5 replicas:
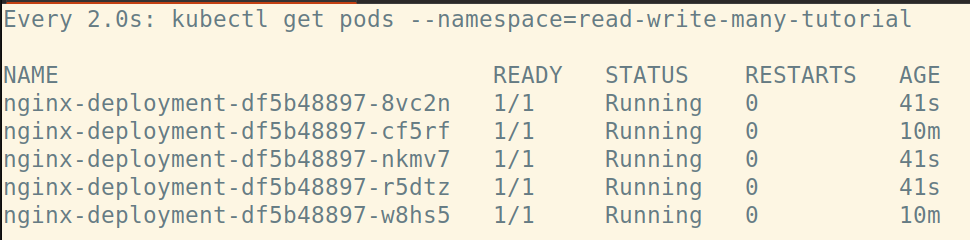
Verify we can access the same data from any of these pods:
kubectl exec --namespace read-write-many-tutorial $(kubectl get pods --namespace read-write-many-tutorial -o jsonpath='{.items[3].metadata.name}') -i -t -- bash -c 'cat /data/test.txt'
Output:
Inconceivable!
Congratulations! You've completed a ManyReadWrite volume and rolled out a deployment using a Shared filesystem.
If you want to, create a service for the deployment, and view it in your browser using port-forward on your localhost machine:
kubectl apply -f test-service.yaml
kubectl port-forward service/nginx-read-write-many 8081:80 -n read-write-many-tutorial
Then visit: http://127.0.0.1:8081/ to view the service.
For example, you might want to edit the deployment and change the mountPath to "/usr/share/nginx/html". This is a really quick way to visualise the writed on the homepage for example, create an index.html in that directiory , edit it, and see the changes reflected regardless of pod being accessed. To do this, simply:
Tear down - how to delete
Remove all resources created, then delete ceph deployment:
kubectl delete -f test-multi-write.yaml
kubectl delete -f test-service.yaml
kubectl delete -f test-filesystem.yaml
kubectl -n rook-ceph delete cephcluster rook-ceph
kubectl -n rook-ceph get cephcluster
kubectl delete -f operator.yaml
Now delete the left over data on the nodes:
Get list of nodes:
gcloud compute instances list
SSH into each node like it's the 90s:
gcloud compute ssh <node-name> --zone us-central1-a # your zone may be different
Then for each of your nodes listed part of your project, remove /var/lib/rook:
sudo rm -rf /var/lib/rook
You should now have an empty kubernetes cluster agin. If you get stuck, and you see errors relating to "cannot delete x becaue namespace y is still terminating" you probably still have some dangling resources left behind. See https://rook.io/docs/rook/v1.0/ceph-teardown.html for more information or just delete the whole cluster in Google Console.
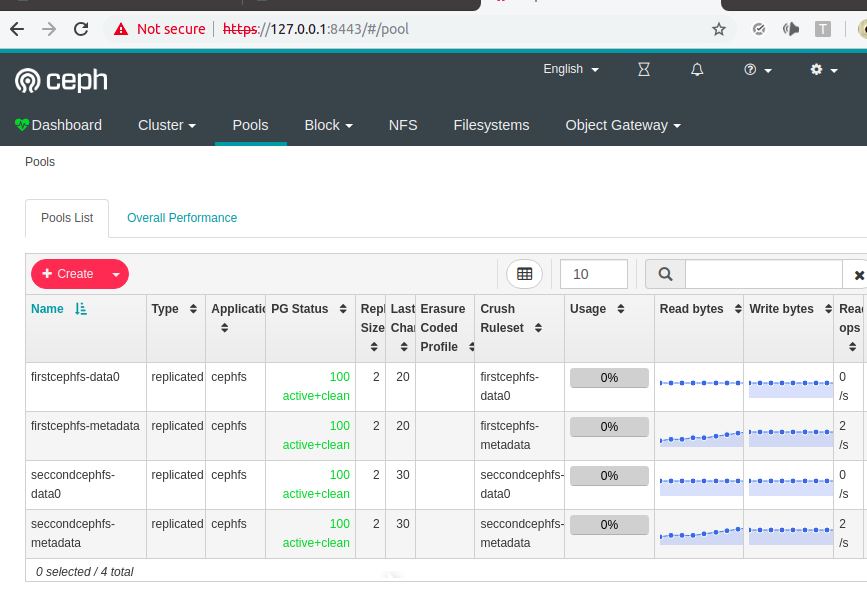
Multiple Filesystems with Ceph on Kubernetes
BETA Feature.
To enable multiple ceph filesystems to be created, edit operator.yaml and set ROOK_ALLOW_MULTIPLE_FILESYSTEMS to "true".
Delete your cluster, and start over, this time with your ROOK_ALLOW_MULTIPLE_FILESYSTEMS set. Everytime you create a new filesystem, for example below, give is a new name. e.g.:
Example seccond filesystem:
apiVersion: ceph.rook.io/v1
kind: CephFilesystem
metadata:
  name: seccondcephfs
  namespace: rook-ceph
spec:
  metadataPool:
    replicated:
      size: 2
  dataPools:
    - replicated:
        size: 2
  metadataServer:
    activeCount: 1
    activeStandby: true

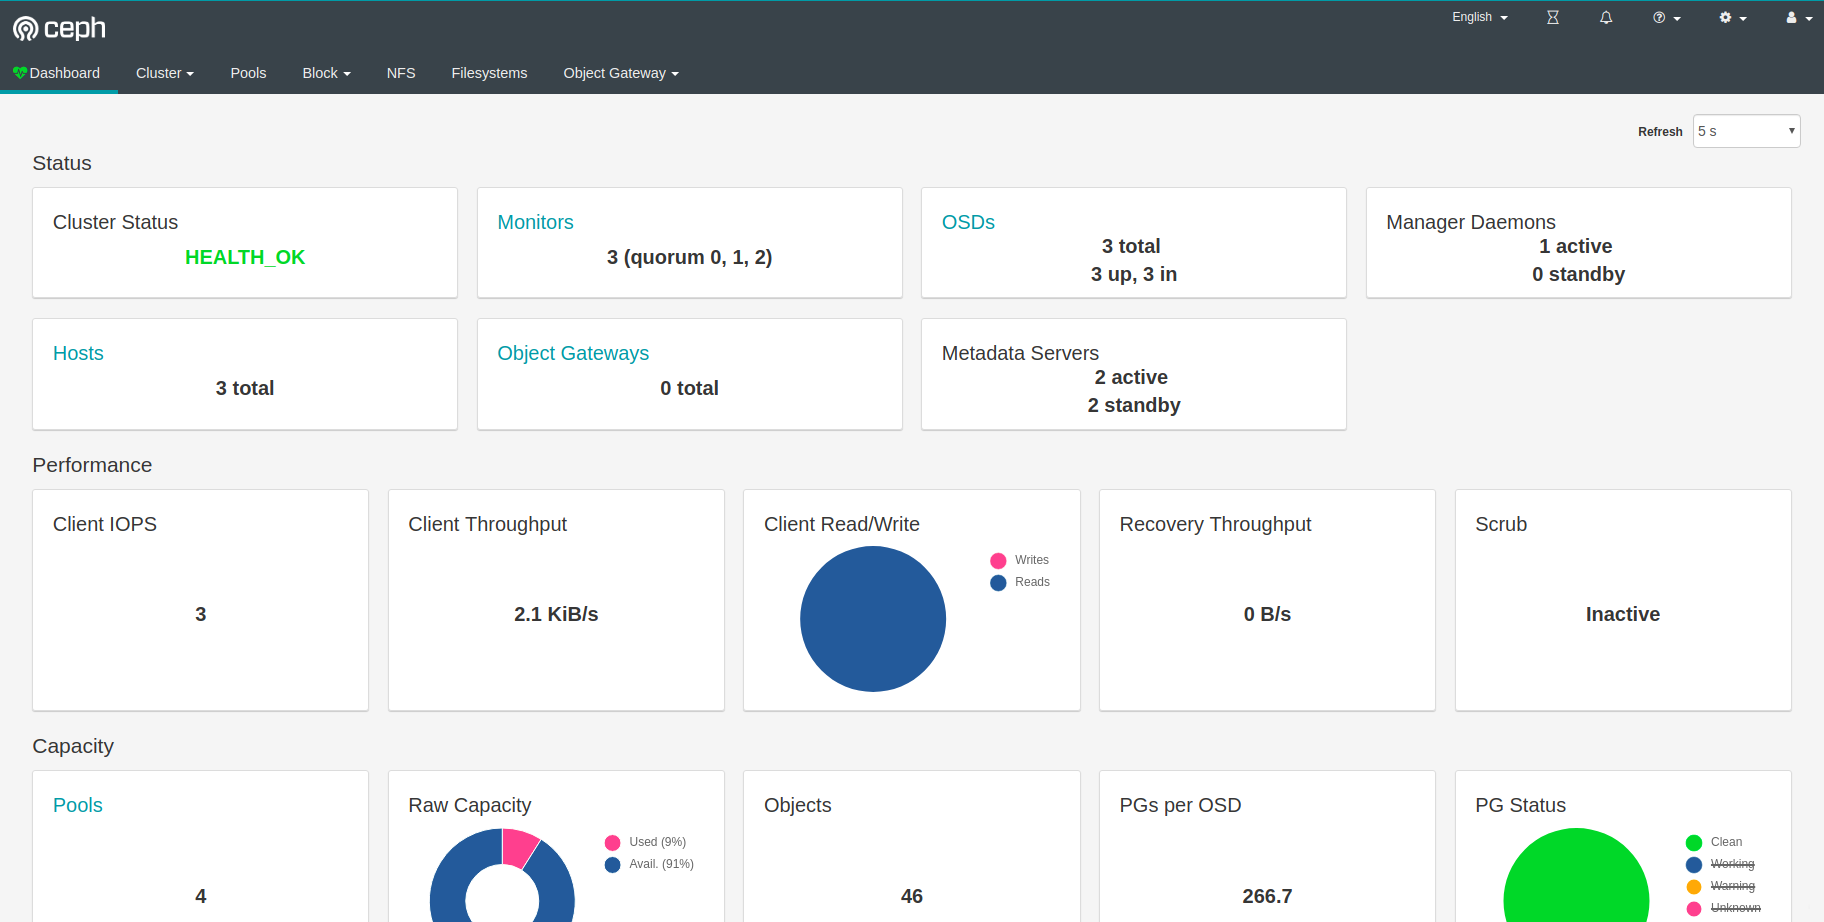
Dashboard
You do not need the dashboard for any of the tutotrial, but it's pretty and very user friendly. If you want to see it:
On your local machine open a terminal and issue:
kubectl port-forward service/rook-ceph-mgr-dashboard 8443:84 -n rook-cep
Now visit: https://127.0.0.1:8443/
Get your password:
kubectl -n rook-ceph get secret rook-ceph-dashboard-password -o jsonpath="{['data']['password']}" | base64 --decode && echo
Username is 'admin', use the output from the above command as your password.
Internal dashboard pages work fine:
The homepage of the dashboard for v1 of this repo has a but which trows 500 erros, but you can navigate to the other pages just fine.
There is a work-around (which might cause more problems than its worth) to fix the dashboard homepage until its fixed: Thanks to noahdesu: https://github.com/rook/rook/issues/3106#issuecomment-490433510
To 'fix' the dashboard (at your own risk of causing problems):
kubectl -n rook-ceph exec -it $(kubectl -n rook-ceph get pod -l "app=rook-ceph-tools" -o jsonpath='{.items[0].metadata.name}') bash
# Then issue:
ceph dashboard ac-role-create admin-no-iscsi
# Then:
for scope in dashboard-settings log rgw prometheus grafana nfs-ganesha manager hosts rbd-image config-opt rbd-mirroring cephfs user osd pool monitor; do
    ceph dashboard ac-role-add-scope-perms admin-no-iscsi ${scope} create delete read update;
done
# Finally:
ceph dashboard ac-user-set-roles admin admin-no-iscsi
Ta-da! Stunning Ceph Dashboard running on Kubernetes with two filesystems. Just Look at that throughput..
Have fun!